Friday, June 25, 2010

The Goody Spin Pin


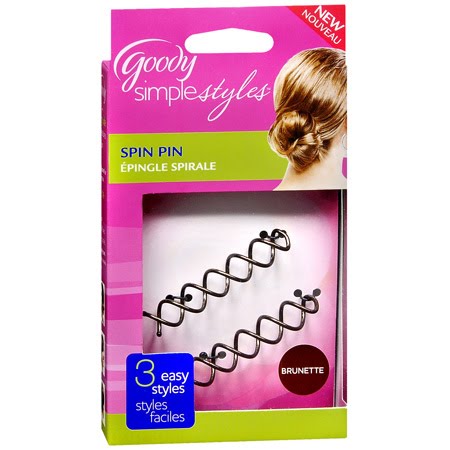
I really like gadgets that make my life easier; so when I saw this little doodad that said it did the work of 20 bobby pins, my ears perked up. I bought the cute little pair of pins that looked like a DNA strand and started working...

The directions say to put your hair in a pony tail, twist your hair around in a bun and twist both pins into the bun (you screw it in basically). I would give it a "pretty good" rating and let me tell you why:

1. If you want the hair that won't be in the bun to be voluminous, messy, textured or anything other than plastered to your head then you still have to do that work outside the spin pin- it really is only a way to secure the hair in the bun

2. You girls with thin, straight, fine or no-texture hair will struggle with this tool. It is really ideal for women with medium to thick hair that has some texture in it. So, if you hair is straight you will need to curl and put some product in your hair to get this to work.

3. My hair did stay secure all night- very helpful (once I figured out the right places to screw in my pins- that you'll just have to work with)

So- that's my conclusion- its ideal of the messy bun, just like its advertised for. Girls with wavy, curly or thick hair this may be a great buy but if you have slick, thin or fine hair, this probably is not the product for you. It struggled a bit to keep straight hair together in a smooth bun.

So, think messy like this:


But keep in mind, the spin pin can't make all that amazing volume up top...

Heck, its just about $3 so just get some and try it.

My first official weddings

The four weeks of June have been the busiest of our whole summer- so it should be all down hill from here. Included in my steamy-hot June were 2 weddings: the first, my good friend Kelly Ramsey (now Kelly Couch) and my cousin-in-law (is that what I would call her?) Skylar Davis (now Skylar Sinkey). Kelly's face has already graced the pages of my blog multiple times but I am waiting on some photos from her photographer before I post her but I have a sneak peak of Skylar:


More photos of both brides will follow.

I was excited about these weddings because I faced two unique challenges: natural looking makeup and dramatic (but not too dramatic) eyes.

Kelly's fiance said "most makeup for girls on their wedding day looks like such sh#$@!" So, clearly the goal was to get Kelly's face to look natural but also even and not too shiny. Not an easy task because the above mentioned fiance said he didn't want to kiss her face and get a mouth full of foundation (good point). So, here's how I solved the problem and here's how you can too. I used two face prep products you may want to have in your makeup kit: mattifying moisturizer and makeup primer. I used a DDF mattifying moisturizer that while moisturizing the face also draws oil away from the face to take away shine. I followed that up with a Smashbox gel primer whose main job is to take away shine, fill in pores and fill in fine lines so whatever makeup is added to the face goes on smoothly.

I let those soak in and followed it up with a light application of liquid foundation (using my Beauty Blender of course). I would recommend a "sheer" coverage foundation if you are really wanting a natural look like this. Next I used a combination of foundation and concealer and applied it to any spots like pimples, scars, freckles or sunspots and blended in. I used the same thing under her eyes. Its important to note, if you use concealer on your face it must be the same color as your face- sometimes people buy a lighter concealer for under the eyes so don't use that lighter shade on your face. I finished Kelly with a light dusting of powder only in her T-Zone (forehead, nose, inner cheeks and chin). Remember, the most powder, the more the skin ages.

So, I think I pulled off the look but you can be the jury once you see pictures.

Now, to North Dakota for Skylar's wedding...

First, I was not originally the makeup artist for her, it just sort of happened and I'm really glad it did. When I showed up to the salon, Skylar was getting false lashes applied by her cousin Mandie (who is an eyelash master and btw recommends Dior mascara as the best she's ever used and this girl has used a lot of mascara so I believe her). Skylar started our session by telling me she wanted to go a little dramatic that she usually does (I love to hear that!) I knew I could get the most amount of drama out of her brown eyes. I figured a subtle smokey eye, a sparkling natural eye or a color eye. She seemed to like the idea of a sparkling natural eye. So, using all metallics, I highlighted her brow, filled the lid with a sparkling peach and accented her crease with my favorite shiny brown from Urban Decay called "Twice Baked". Now, we went on a limb and did a slight cat eye (woo hoo) and this was the "out of the comfort zone" moment. I am really proud of Skylar because she stuck with it and she told me later she was so glad she did.

So- all in all Skylar still looked like herself with just a little more pizazz (and I LOVE pizazz). More photos will follow as I get them but as for my first round of weddings- not too shabby.

Saturday, May 29, 2010

Watch out for the SPF Flash!

We all know lots of our foundation products (concealers, liquid foundations, mineral foundations) are all formulated these days with SPF in them. Now, don't get me wrong, SPF has its place on our face keeping our skin in great condition but you just need to watch out for one important thing- the SPF Flash:


This sweet, beautiful woman has become the next victim of the SPF flash. The nature of SPF products is to get light to reflect off the face, instead of absorbing it so, naturally when SPF makeup is flashed by light from a camera it sort of bites back by reflecting the light off your face- causing that infamous "white face" look. I know many women who have seen pictures after a party, stupefied trying figure out if their makeup was really that badly matched, if it was the camera angle or something else- it was their makeup. So, if you are heading to any event where camera flashes will be involved- use an SPF free foundation product (and possibly even an spf free moisturizer) and you're face will come out flawless- like this:


Flawless finished for my flashed homegirl Emma Roberts- she is fully flashed by cameras on the red carpet and her face is perfect!

So, ladies, use your SPF products for every day because they do protect your face but when you go out and you know there will be pictures, invest in some SPF free products. And just an FYI, almost every mineral foundation (bare minerals) comes with SPF I have spent hours searching for an SPF free mineral foundation product and I don't think it exists, I think its an urban ledgend.

I hope this is helpful, have a great day and remember- you can do it!

Budding Photographer!

Hello Again!

Looks like it's all boom and bust for me and blogging but better that way than never posting. I had a chance in the last few months to work on my photography with some friends of mine. I've gotten a "couple" session, graduating senior session and an engagement session. With every shoot I learn a lot like: yes, it can be too bright at 6:45pm, I have a love/hate relationship with the wind, if you shoot downtown take some bodyguards and finally color walls are my best friend.

With those things in mind here are some of my favorites from those shoots. L.Schott Artistry is branching out- not just makeup and hair but I'll take your pictures too!

New Faces!

Wow! I have not been here in quite a few days but it's definitely been that lingering thought in the back of my head. I have a few more faces to show today that I am very proud of and will have almost a dozen more in the next two weeks but this is a preview. Thanks to each of my friends/models for volunteering their face for my science- you will forever be immortalized in my blog (kind of).


Saturday, May 15, 2010

The Beauty Blender


Hello My Friends!

I just received my Beauty Blender sponge in the mail a few days ago and one word comes to mind...Wow! I love this little pink bubble. Not only is it soft and cute (like a little puppy) it actually WORKS!

Now, in the past I have used rounded, flat, triangle and wedge sponges, powder puffs and multiple brushes and this little pink thing covers better than them all (although my finger still does a really good job with concealer and shadow). Alright, let me give you a break down as to why I like this little thing:

1. Moist and delicious- The BB works best a little damp so the sponge will absorb the water first and not your foundation...much product has been wasted on a thirsty sponge! I find the coverage comes out smooth, even and creamy.

2. Big and beautiful- The bottom of the BB is large and round which makes for very even blending, no streak lines and soft coverage.

3. Quite pointy in parts - The tiny cone shaped top is perfect for little areas like under the eye or blemishes that need some extra help.

4. Multi-tasker- The BB works with liquid, cream and powder foundations, loose and pressed powders and even blush. One sponge can do a lot!

5. Ready for a close up - I find the coverage with this sponge is super soft, even, long lasting, not cakey looking, comfortable and EASY! To get my foundation as well blended as I do with just a tiny bit of effort with the BB takes at least twice as much time with my old sponge or brush.

6. The sponge shouldn't be pink, it should be GREEN- the cleanser I purchased with my BB is eco-friendly (so I feel a little better about soaking the sponge for my face in it and won't kill my puppy if she gets into it!) AND when you are done with your BB they will recycle it for you (cha-ching!).

So, those are some of my reasons! The price for the BB if you are interested varies with how many you are getting and whether or not you are buying the cleanser (which I HIGHLY recommend) but from what I've found online, the prices are consistent everywhere. This may seem like a significant price to some but I think it's really worth it whether its just for personal use or whether you are a professional. The coverage really is striking and the Beauty Blender speaks for itself the first time you use it.

Go try it! You can do it!

Wednesday, April 28, 2010

False Eyelashes - Strip Eyelashes


Putting on False Eyelashes:


Tools:
False Lashes (this tutorial is for strip, not individual cluster lashes)
Adhesive (glue)
Applicator (usually in the kit)
Tweezers
Small scissors
Tissue
Q-Tips (optional)

Get all your tools together and put your lashes in front of you according to which eye they go on, now start:

1. Start with the left eye and put the false lash up to your eyelid to measure the length. Trim the lash if it seems like the lash will be too long. (you want the false lash to match with your existing lashes and not extending beyond your natural lashline)
2. Next apply the lash adhesive directly to the lashes. You can do this directly from the tube, with your finger or with a Q-Tip- whichever you feel more comfortable using. Then wait a few seconds and blow on the adhesive.
3. Apply the lashes now to your eye after the adhesive is tacky (not liquid). Starting from the outside, place the lashes as low as you can on your eyelid- as close as possible to your natural lashline. This is the key- as low as you can! Keep placing your lashes as low as you can working your way from the outside to the inside of your eye.
4. Once your lashes are in the right place (open your eye just to make sure there's no gap)then run your finger along your lashes, making sure they're stuck on like a sticker.
5. If you feel you want to, you can blend the lashes with some black or dark brown eye shadow to soften the line. Also, if you want you can follow up with more mascara but usually its not needed.

Now follow the same steps with your right eye. Take your time and don't panic- just keep working with the lashes.

You can apply lashes before or after your full makeup. I prefer to do it after because I think putting on eyeliner, eye shadow and mascara is more difficult when your false lashes are on (you have to deal with the plastic line and the adhesive). Some people like to do it first because if your eyes water, it won't ruin your makeup. The best thing is to try both and see what you like.

Also, don't get lashes and try them for the first time 15 minutes before you go out. Do a trial run- it will help you in the long run.

Remember you can do this! Have fun and let me know how it goes!